Masks in Eduard
A mask locally varies the effect of a layer. Where a mask is white, the masked layer is fully visible, and where a mask is black, the layer is invisible.
Adding and removing a mask
Add
one or multiple masks to vary the effect of a layer with terrain elevation, slope or the brightness of an image. Choose Shading > Add Mask or click on a square-circle icon
![]() in the list of layers.
in the list of layers.
When multiple masks are added, the order of masks does not influence the total masking effect.
In the example below, two masks have been added. The pointer is over the first Slope mask, which shows two buttons.
• Enable or disable a mask with the eye button.
• Remove a mask with the minus button.

Image file masks
Add a mask stored in an image file with Shading > Add Mask > Image File. Color images are converted to grayscale mask values.
When a mask is loaded from an image file , it is horizontally and vertically scaled to the size of the entire grid. If the mask image file uses a different coordinate reference system or covers an area that is different than the area of the grid, the mask image should first be aligned with the grid using GIS software.
Mask settings
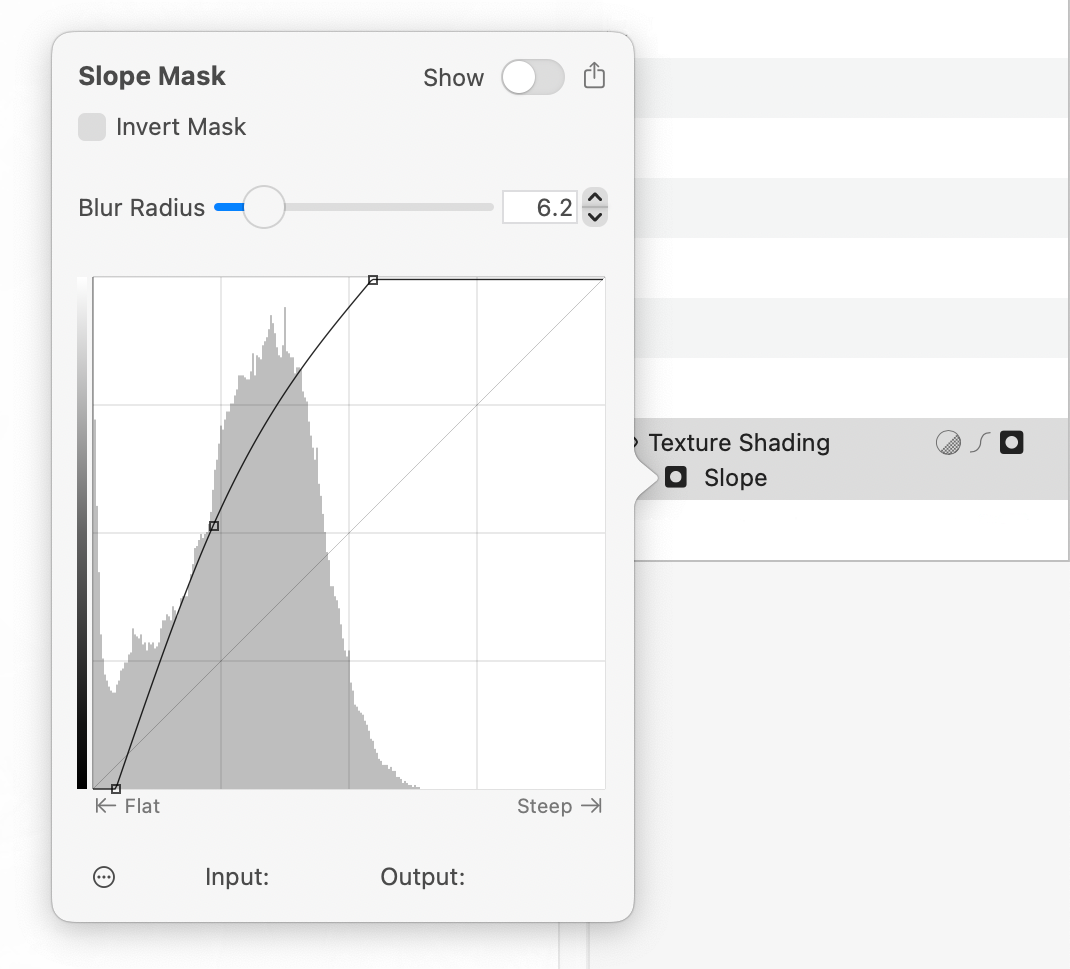
Click on a mask name or the filled mask icon
![]() to the left of the name to open the dialog below.
to the left of the name to open the dialog below.
Toggle the Show button to see fully masked areas in black, and unmasked areas in white.
Toggle the Invert Mask button to invert the gray values of the mask.
Blur the mask with a Gaussian blur filter.
Adjust the values with a mask curve . The curve works in the same way as the curve for layers , but affects the mask. The mask created in the example below results in the layer not having any effect in flat areas, and having full effect in steep areas.
The histogram shows the distribution of mask values. The range of possible slope or elevation values is displayed below the histogram. The range for slope masks is between 0° and 90°. The range for elevation masks is between the lowest elevation and the highest elevation in the grid. The slope or elevation of the location under the mouse pointer is displayed below the histogram.
Keyboard shortcuts
Command-S: Showing and hide the mask.
Command-E: Export the mask image.
Command-I: Invert the mask.

See also
![]()